Basics of Filtering with Vapoursynth
Intro to Filters
In order to do filtering, we are going to need some filters. Vapoursynth includes some basic filters, but there are a lot more useful filters built by the community that can be incredibly useful to us.
For example, we are going to make use of some of the functions in vs-tools.
If you are on Arch, the recommended way to install this is via the AUR, using the vapoursynth-plugin-vstools-git package.
For other operating systems, it is simpler to install all of the JET plugins at once, using the vs-jet utility.
Note that these do require Python, which you should already have installed if you've installed Vapoursynth. You may have noticed in the previous section
that all Vapoursynth scripts use Python syntax. It is not necessary to know Python in order to write Vapoursynth scripts, although it can be helpful
for some more advanced techniques.
Filter Order
Order matters when applying filters to a video. There are certain actions that must be taken at the very start, and certain actions that are better to be done later in a filter chain. The following image shows a recommended order for many of the most common filter actions:
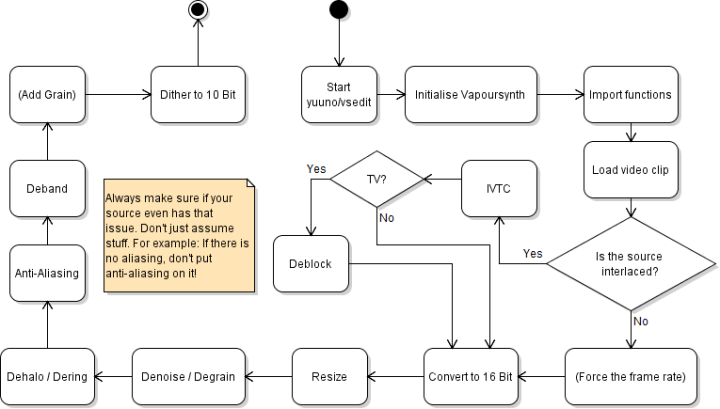
If this seems a bit complicated at first, that's okay. We will learn about each of these steps one at a time, and when each of these filters might be needed.
Bit Depth and Colorimetry
In most cases, the first action we want to take on a video is to ensure the correct matrix, primaries, and transfer characteristics are set, and convert the video to 16-bit. The colorimetry properties are important for ensuring accurate colors, and 16-bit helps filters to work in higher quality and create fewer artifacts.
The currently recommended way to handle this is with the vstools.initialize_clip function. This function will handle both ensuring that colorimetry is set, and converting to 16-bit with appropriate dithering if needed.
We can add it to a script in the following way:
import vapoursynth as vs
core = vs.core
clip = core.lsmas.LWLibavSource(source="myinput.mkv")

import vstools
clip = vstools.initialize_clip(clip)

clip.set_output(0)
If the video has existing colorimetry data set on it, initialize_clip will keep the existing data. Otherwise, it will assume colorimetry based on the video resolution.
Usually, those assumptions will be correct. However, there may be cases where we know that the assumptions are incorrect, and we need to set them manually.
For example, we may have a 4k video that we know was upscaled from a 1080p video, and we want to force BT.709 colorimetry. In that case, we can specify the properties to initialize_clip,
and it will use the properties we specify instead of making guesses.
from vstools import Primaries, Matrix, Transfer
clip = vstools.initialize_clip(clip, primaries=Primaries.BT709, matrix=Matrix.BT709, transfer=Transfer.BT709)
initialize_clip also has a companion function called finalize_clip which will, by default, convert the video down to 10-bit with dithering, and if the video is in limited color range,
clip all pixels to fit within the limited color range (this would be done by the player on playback, but if we do it now, we can save a few bits for the encoder). The function also takes
a bits parameter in case you would like to finalize to 8-bits instead.
As a result, a very basic template for a Vapoursynth script would be something like this:
import vapoursynth as vs
core = vs.core
clip = core.lsmas.LWLibavSource(source="myinput.mkv")

import vstools
clip = vstools.initialize_clip(clip)
//
// Add filters inside this section
//
clip = vstools.finalize_clip(clip)


clip.set_output(0)
Cropping
Sometimes, you may encounter a source that has black bars on the sides or on the top and bottom. Generally, we don't like to keep these, and want to remove them. This process is called "cropping".
First, we need to figure out how many pixels to crop from each side. Fortunately, vs-preview has a tool to make this easy. Using this tool, which is found under the "Misc" section in the bottom right of the app, allows us to experiment with crop values and find the correct ones without having to reload the Vapoursynth script.

Once we flip the tool to "On", we can adjust each of the dimensions until we see the black borders disappear. We want to try to get as exact as possible, although the crop values must be a multiple of 2 when working with YUV420 video (which is the most common). In this case, we know we want to remove from the top and bottom, so we will adjust those values until we find the right ones. Note that the size of the bars may often be the same on both sides, but not always, so do be careful to check both sides.

vs-preview's zoom tool shown here can also be helpful to ensure we've gotten the right values.
Once we've found the correct values, we can click "Copy cropping command" to copy our value to the clipboard. We can then paste it into our Vapoursynth script, being sure to add the appropriate variable name for our clip.
clip = clip.std.Crop(0, 0, 138, 138)
Remember to turn off the crop tool in vs-preview, or else we'll be doubling the crops from here on. Now, go ahead and reload the preview with Ctrl+R. No more black bars.

Resizing
Resizing is the process of changing the resolution of a video, whether that's making it bigger or smaller. Note that although the general idea is that "higher resolution is better", we generally don't want to upscale content. This simply makes output videos larger in file size, but doesn't result in an increase in quality, because the higher resolution is artificial. However, there are times when you may want or need to resize a video. Unfortunately, this is not as simple as it sounds, because we want to select a high-quality resizing method.
With this section, we'll introduce slow.pics, a very useful tool for comparing screenshots. Here, we'll be using it to show the differences between various resizers.
Vapoursynth comes with several resizers built-in, which will be the easiest to use. Of these, we'll be showcasing the following:
clip = clip.resize.Bicubic(1920, 1080)
clip = clip.resize.Lanczos(1920, 1080)
clip = clip.resize.Spline36(1920, 1080)
Bicubic is the most widely used resizer. It is very fast and produces decent quality, but may produce less sharpness than more advanced scalers. Lanczos produces more sharpness, but may also produce more ringing. Spline36 uses a spline-based resizing method, and produces results somewhere between Bicubic and Lanczos.
However, using plugins, we have access to some more advanced scalers.
clip = vskernels.Catrom().scale(clip, 1920, 1080)
clip = vskernels.Catrom(sigmoid=True).scale(clip, 1920, 1080)
clip = vskernels.Hermite(linear=True).scale(clip, 1920, 1080)
clip = vsscale.SSIM().scale(clip, 1920, 1080)
Here we will look at downscalers.
Catrom, short for Catmull-Rom, is a variant of Bicubic which uses different parameters in order to achieve a better balance between sharpness and ringing. It is often considered the best of the Bicubic kernels for image quality.
In the second example, you can see that we pass an additional sigmoid=True parameter to Catrom. This performs the scaling using a sigmoid function, which flattens the ends of the scaling curve to reduce ringing.
The third example here, Hermite, is another variant of Bicubic, and we are passing linear=True to perform the rescaling in linear light rather than in gamma light. This kernel is very good in regard to
not producing ringing, but it does have the effect of thinning line art. Therefore, although some users prefer it, other users dislike it.
Fourth, we have SSIM, which is a downscaler tuned around the SSIM video quality metric. This downscaler is intended to prioritize preserving detail and sharpness when downscaling.
In this comparison, we can see the differences between the different scalers, on an image that was upscaled to 4k by nnedi3, then downscaled back using the scaler noted in the image title. Here we have a couple of other examples comparing in particular the higher-quality scalers.
Of these, my current recommendation would be Catrom(sigmoid=True) for anime, and SSIM for live action. Some users may prefer Hermite(linear=True) for anime.
For upscaling, we have the following high quality options:
clip = vskernels.EwaLanczos().scale(clip, 3840, 2160)
clip = vsaa.Nnedi3().scale(clip, 3840, 2160)
clip = vsscale.Waifu2x().scale(clip, 3840, 2160)
Ewa-Lanczos is a variant of lanczos intended for high sharpness, making it good for upscaling, where we want an image to look sharper so that it does not appear upscaled.
Nnedi3 is a neural-network-based upscaler which attempts to interpolate every second line to produce a sharp, upscaled image. It is generally safe for use on all content, and produces good results.
Waifu2x is another AI-assisted upscaler, this one tuned specifically on anime. It produces very high quality and sharp images. However, the results of using it on live action content are unknown, so it is recommended to only use it on anime.
Here we can see the effects of these upscalers. My current recommendation would be EwaLanczos for live action, and Waifu2x for anime.
clip = soifunc.good_resize(clip, 1920, 1080)
clip = soifunc.good_resize(clip, 1920, 1080, anime=True)
Lastly, we have soifunc.good_resize, which is a smart hybrid scaler which automatically chooses the best scaler depending on whether we are upscaling or downscaling,
and may use a different scaler for chroma than it does for luma for even better quality.
Note that the scalers chosen by this function may change over time as new knowledge surfaces, and are based on the above recommendations.
We can also add the anime=True parameter (false by default) to change the scalers to be tuned
more toward the fine line art that is present in anime, rather than the highly detailed elements such as skin and hair that are present in live action.
With these features, it is intended to be an easy-to-use general purpose high-quality upscaler.
Trimming
Sometimes, we may need to cut out a portion of the video, for example, if we want to encode only the opening theme, or if our source has commercials that we want to remove. Vapoursynth supports this using Python's slice syntax.
clip = clip[1805:3185]
This snippet will trim the clip to include frames 1805-3184. Note that frame 3185 is not included.
Now, let's say we wanted to exclude this segment. We can do this by making clips of the segments we'd like to keep, and joining them together.
clip = clip[:1805] + clip[3185:]
This snippet will create trims for the start of the clip to and including frame 1804, and from frame 3185 to the end of the clip. It then joins them together into one clip, in the order we specify. If we wanted to reverse the segments, so that segment 2 comes first, we could do that simply by changing the order:
clip = clip[3185:] + clip[:1805]